Troubleshooting
issues with Windows Fax and Scan not sending or receving
faxes
Step
1:
Open the "Windows Fax and Scan" Window,on the NetModem Client PC, by
clicking the Start button, and navigate to All Programs
> Windows Fax and Scan.
An alternative method is to type "Fax" in
thge search box, and then select "Windows Fax and
Scan from the results list above.
In
the "Windows Fax and scan" window, check the
message in the lower right corner of the window.
Normally it should say "All Fax accounts are accessable".
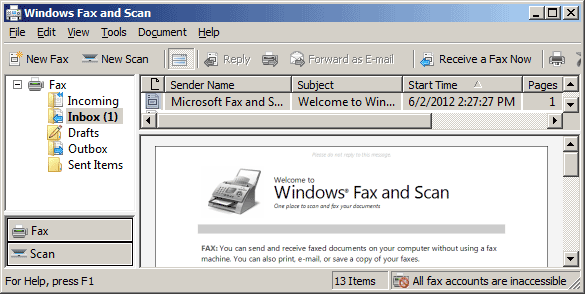
If it says that some or all fax accounts are inaccessible,
then take the following steps to delete and re-create
the fax account::
A. In Windows Fax and Scan, click Tools, and then click
Fax Accounts.
B..In the Fax Accounts dialog box, select the fax account
that you want to delete, and then click Remove.
C. Click Add, and then follow the steps that are in
the wizard to create a new fax account.
Step 2:
Open the "Phone and Modems" applet in the
Windows Control Panel, and click on the "Modems"
tab.
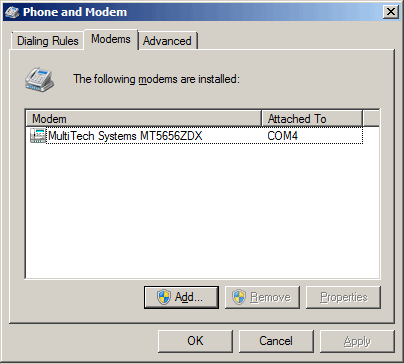
Confirm the following:
- The Modem is attached to the same COM port which
is defined in NetModem Client.
- If multiple modems are installed on this PC, make
sure that none of the other modems are also attached
to the same COM port.
- The name of the modem should match the brand and
model number of the modem located on the NetModem
Server.
Avoid using "Standard" modem drivers.
If you change the modem driver that the NetModem Client
COM port is attached to, then do the following::
- Stop the "fax" service and then restart
it, either from the Services applet in the Controll
Panel (Usually found under Administrative Tools),
or it can be done from an "Adminitstrator Command
Prompt" by typing the following command lines:
NET STOP FAX
NET START FAX
- Return to step 1, to make sure that "Windows
Fax and Scan" does not show that the fax account
is inaccessable.
For assistance with installing a Modem driver on the
NetModem Client COM port, see Chapter
7 of the NetModem User's Guide.
Step 3:
From the "Windows Fax and Scan" window, click
on Tools > Fax Settings,
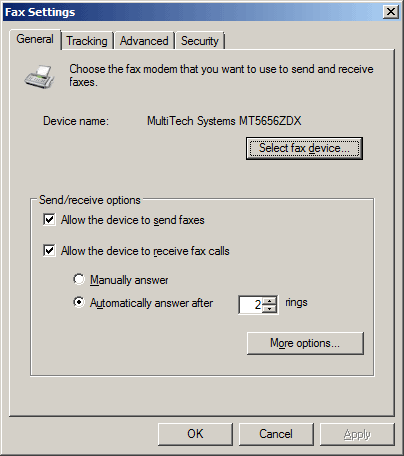
From the "Fax Setrtings" window, confirm
the following:
- The Fax Device name shown here must match
the modem name which was shown in Step 2.
If it does not match, click the "Select fax device"
button to select the correct device.
Note: This button will be disabled if the currently
selected device is the only functional modem.
- If you wish to send faxes on this device, the "Allow
the device to send faxes" must be checked.
If you wish to receive faxes on this device, the "Allow
the device to receive fax calls" must be
checked, and the "Automaticaly answer" option
should also be checked..
If there is no device name displayed at all, and the
"Select fax device" button is disabled, this
indicates
that none of the modems defined in the Control panels
"Phone and Modems" applet are functioning.
Step 4:
Check that the NetModem Client's COM port is functioning
(and able to detect the physical modem
on the server) by performing the following:
- Temoprarily stop the fax service, either from the
Windows Control Panel's "Services" appliet
(usually
Found under Administrative tools), or by opening an
Administrator Command Prompt and typing
NET STOP FAX
- Open the NetModem Client Configuration program,
by clicking the Start button and navigating to
All Programs > NetModem Client > Configure NetModem
Client.
- From the NetModem Client Configuration, click the
"Test Server Connection" button.
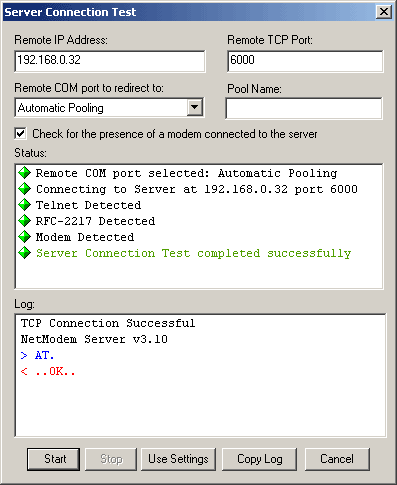
- From the "Server Connection Test" window,
click the "Start" button, and make sure
that the
Server Connection Test completes sucessfully.
If the test fails, then review the "Troubleshooting
and Technical Notes", section of the NetModem
Users Guide,
Chapter 16 to resove the issue.
If the test completes sucessfully then restart the
Fax service, either from the Windows Control Panel's
"Services"
appliet (usually Found under Administrative tools),
or by opening an Administrator Command Prompt and
typing
NET START FAX
Step 5:
If NetModem Client is not running on a Server
version of Windows, then skip this step.
The Microsoft Fax Service Manager is not available in
Windows 8.x, 7, Vista, or XP.
Open the "Microsoft Fax Service Manager",
by clicking Start and typing "fax" into the
search box, and then
select "Microsoft Fax Service Manager" from
the results list above it.
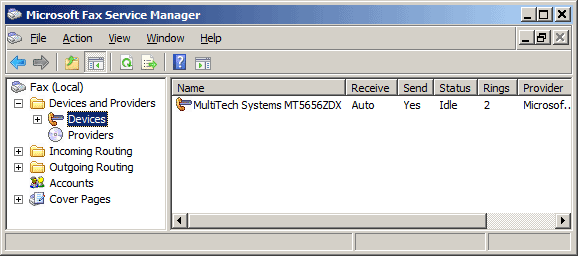
From the Microsoft Fax Service Manager, select Devices
(Under Devices and Providers), and confirm that
Receive is set to "Auto" (if you wish to receive
faxes", and that Send is set to "Yes"
I(if you wish to send faxes.
To change the values of either of these fields, Right-Click
on "Fax (Local)" and select "Properties"
to bring up
the properties window:
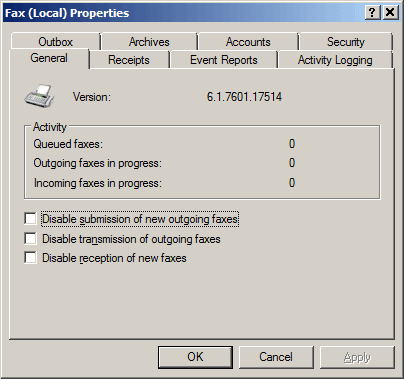
From the Fax (Local) Properties, Uncleck any
of the 3 "Disable" checkboxes here as desired,
and click "OK".
Step 6:
After performing the above steps, test that you are
now able to send or receive faxes using Microsoft Fax
and Scan.
If the faxes are being sent or received unreliably,
such as incomplete pages or containing garbage, then
check the following:
Determine if your fax modem supports Fax Class 2
or Fax Class 2.x. These Fax Classes are more
reliable at sending faxes over a networked modem then
Fax Class 1, as they use the hardware data pump to perform
the work. Fax Class 1 uses the PC's CPU instead, and
is therefore timing sensitive and can thus it can possibly
be be effected by network latency. Unfortunatly many
of todays inexpensive "Softmodems" only support
Fax Class 1.
How to confirm which Fax Classes your installed modem
supports:
- Type
"device manager" in the Start Search
box, and then click Device Manager in the Programs
list.
-
Expand Modems, right-click the modem
that you use, and then click Properties.
- On
the Diagnostics tab, click Query Modem.
- In
the Command column, locate AT+FCLASS=?,
and then note the value in the Response column.
Note:
If the Response column contains a value of 1,
2, or 2.0, the modem
supports Class 1, Class 2,
and Class 2.0, respectively.
Class 2 and Class 2.0 are NOT the same protocols, and
it is important to configure the fax software based
on which protocol is supported by the modem. Class
2.1 is software compatible with Class 2.0, so if the
fax modem supports Class 2.1 you can specify Class 2.0
in the software.
If your fax modem supports Class 2 or Class 2.x, you
should enable the proper Fax Class in Microsoft Fax
as described on our Using
Microsoft Fax with NetModem page.
If you are still having issues after following these
steps, then open a Technical
Support Ticket.
|