|
While these notes are for sharing modems, the same
principle applys to sharing other serial devices.
TCP-Com works with nearly all Serial Devices, including::
- Bar code scanners
- Gauges
- Meters
- RF equipment
TCP-Com can also be used with modems to a limited degree,
but we offer another product better suited for TCP/IP
Modem use called NetModem.
1. Configuring TCP-COM as a Serial Server Server
Install TCP-Com on the PC where the serial device(s)
are physically installed.
Configure it like this, changing the COM port to the
proper COM port that the serial device
is physically connected to on this PC:
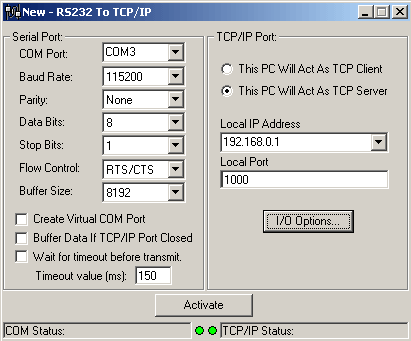
Once this is configured, click the "Activate"
button.
If you have more then Serial device you wish to share,
click on "File" > "New"
to create another session, and for each serial device
you will need to do the same, using the proper COM port,
and use a unique "Local Port" (the TCP/IP
port) for each one.
For example if you have 3 devices, you could place one
on port 1000, one on port 1001, and one on port 1002.
Do not close any of the "RS232
to TCP/IP" Session Windows.
You can minimize the entire TCP-Com Window so
that it runs in the system-tray, or you can close it
and the next time you run it all the same Session Windows
will reopen just as they were previously configured.
If you close the TCP-Com Window entirely, the TCP/IP
redirection will be disabled until it is opened again.
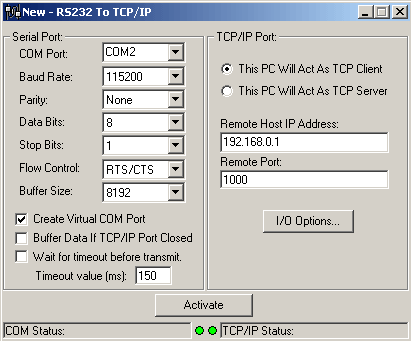
2. Configuring TCP-COM
as the Client COM port
Install TCP-Com on the PC where you wish to access
the serial device(s) from.
Configure it like this, changing the COM port to a value
that does not already exist in your PC:
Be sure that the "COM Port" you select, is
one that does not already exist on the Client PC.
The COM port you select here is the name of the Virtual
COM port which will be created, and it does not need
to match any of the COM port values that are on the
Server PC.
Once this is configured, click the "Activate"
button.
If you have more then one modem being shared on the
server, click on "File" > "New"
to create another session, and for each modem you will
need to do the same, using a unique virtual COM port,
and use a change the "Remote Port" to the
value of the TCP/IP "Local Port" you defined
on the Server PC for that modem.
Do not close any of the "RS232
to TCP/IP" Session Windows.
You can minimize the entire TCP-Com Window so
that it runs in the system-tray, or you can close it
and the next time you run it all the same Session Windows
will reopen just as they were previously configured.
If you close the TCP-Com Window entirely, the TCP/IP
redirection will be disabled until it is opened again.
You can have TCP-COM automaticly startup each time
you boot windows, by adding a shortcut to its icon in
the Windows StartUp folder.
If you encountered any difficulties, please contact
either your PC Micro Account Manager, or
you can fill out a support request form on our web site
here:
https://pcmicro.com/tcp-com/support_request.html
|